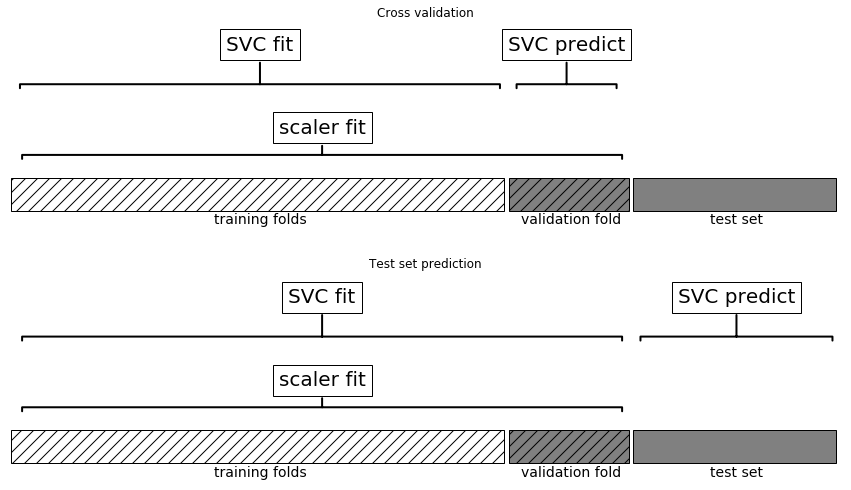
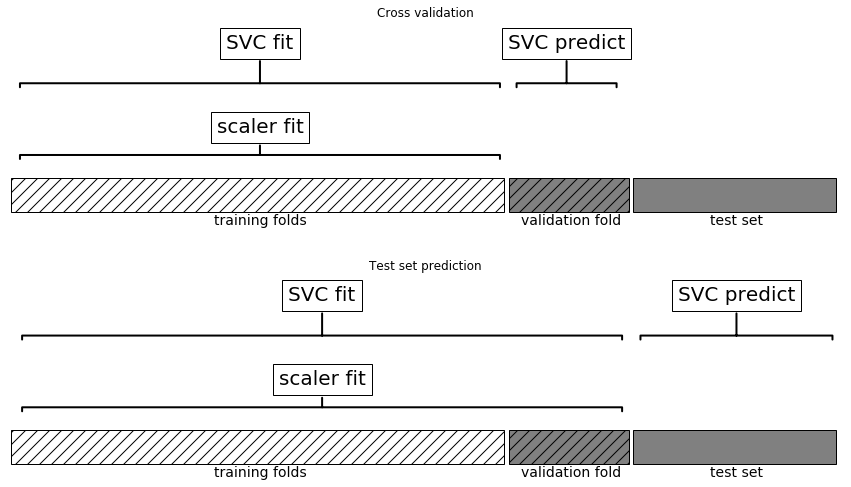
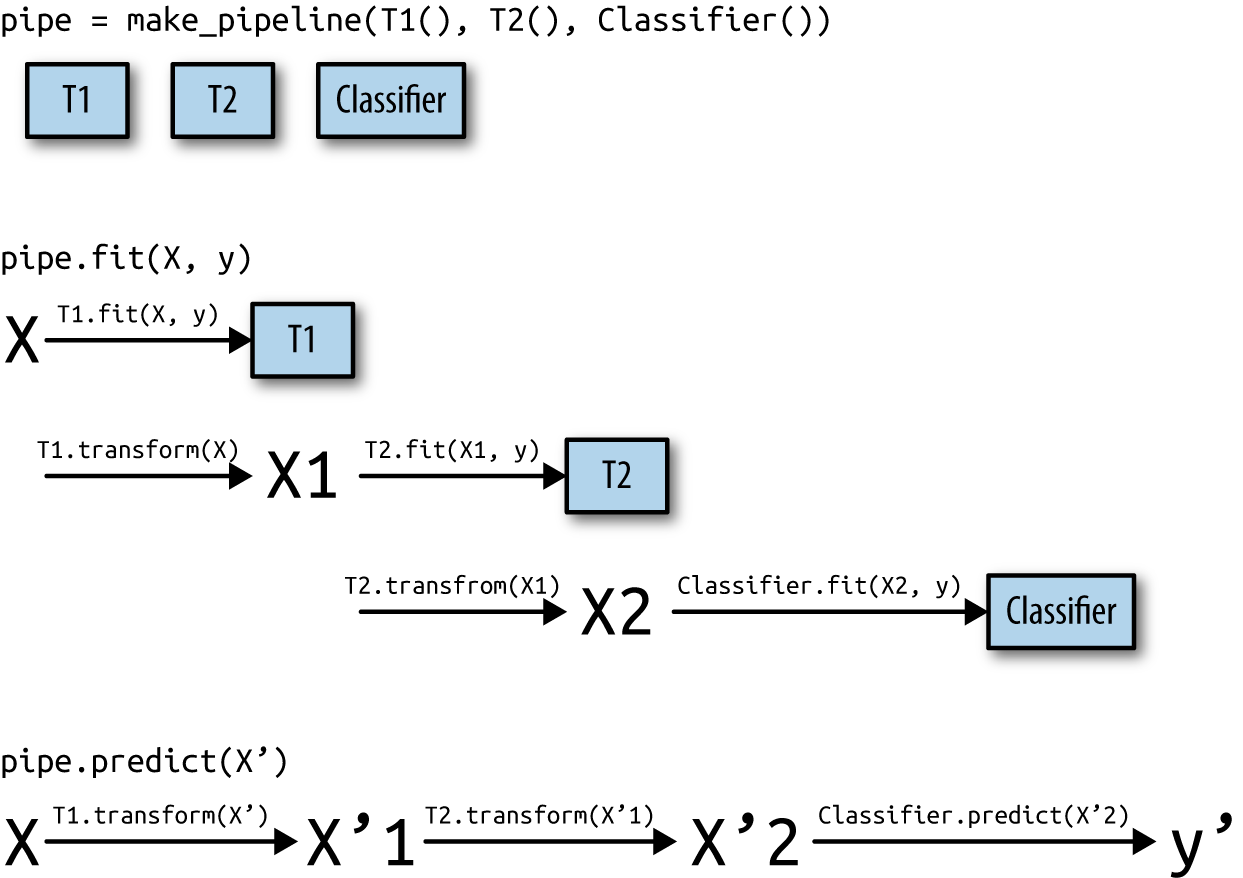
class: center, middle  ### Advanced Machine Learning with scikit-learn # Pipelines Andreas C. Müller Columbia University, scikit-learn .smaller[https://github.com/amueller/ml-training-advanced] --- class: center, middle # A note on preprocessing ??? I want to talk a bit more about preprocessing and cross-validation here, and introduce pipelines. --- class: some-space #Leaking Information .left-column[ Information Leak  ] .right-column[ No Information leakage ] .reset-column[ Need to include preprocessing in cross-validation ! ] ??? What we did was we trained the scaler on the training data, and then applied cross-validation to the scaled data. Tha’s what’s show on the left. The problem is that we use the information of all of the training data for scaling, so in particular the information in the test fold. This is also known as information leakage. If we apply our model to new data, this data will not have been used to do the scaling, so our cross-validation will give us a biased result that might be too optimistic. On the right you can see how we should do it: we should only use the training part of the data to find the mean and standard deviation, even in cross-validation. That means that for each split in the cross-validation, we need to scale the data a bit differently. This basically means the scaling should happen inside the cross-validation loop, not outside. In practice, estimating mean and standard deviation is quite robust and you will not see a big difference between the two methods. But for other preprocessing steps that we’ll see later, this might make a huge difference. So we should get it right from the start. --- class: smaller ```python from sklearn.linear_model import Ridge X, y = boston.data, boston.target X_train, X_test, y_train, y_test = train_test_split(X, y, random_state=0) scaler = StandardScaler() scaler.fit(X_train) X_train_scaled = scaler.transform(X_train) ridge = Ridge().fit(X_train_scaled, y_train) X_test_scaled = scaler.transform(X_test) ridge.score(X_test_scaled, y_test) ``` ``` 0.634 ``` ```python from sklearn.pipeline import make_pipeline pipe = make_pipeline(StandardScaler(), Ridge()) pipe.fit(X_train, y_train) pipe.score(X_test, y_test) ``` ``` 0.634 ``` ??? Now I want to show you how to do preprocessing and crossvalidation right with scikit-learn. At the top here you see the workflow for scaling the data and then applying ridge again. Fit the scaler on the training set, transform on the training set, fit ridge on the training set, transform the test set, and evaluate the model. Because this is such a common pattern, scikit-learn has a tool to make this easier, the pipeline. The pipeline is an estimator that allows you to chain multiple transformations of the data before you apply a final model. You can build a pipeline using the make_pipeline function. Just provide as parameters all the estimators. All but the last one need to have a transform method. Here we only have two steps: the standard scaler and ridge. make_pipeline returns an estimator that does both steps at once. We can call fit on it to fit first the scaler and then ridge on the scaled data, and when we call score, it transforms the data and then evaluates the model. The code below is exactly equivalent to the code above, only shorter. --- class: left, middle .center[  ] ??? Let’s dive a bit more into the pipeline. Here is an illustration of what happens with three steps, T1, T2 and Classifier. Imagine T1 to be a scaler and T2 to be any other transformation of the data. If we call fit on this pipeline, it will first call fit on the first step with the input X. Then it will transform the input X to X1, and use X1 to fit the second step, T2. Then it will use T2 to transform the data from X1 to X2. Then it will fit the classifier on X2. If we call predict on some data X’, say the test set, it will call transform on T1, creating X’1. Then it will use T2 to transform X’1 into X’2, and call the predict method of the classifier on X’2. This sounds a bit complicated, but it’s really just doing “the right thing” to apply multiple transformation steps. --- .padding-top[ ```python from sklearn.neighbors import KNeighborsRegressor knn_pipe = make_pipeline(StandardScaler(), KNeighborsRegressor()) scores = cross_val_score(knn_pipe, X_train, y_train, cv=10) np.mean(scores), np.std(scores) ``` ``` (0.745, 0.106) ``` ] ??? How does that help with the cross-validation problem? Because now all steps are contain in pipeline, we can simply pass the whole pipeline to crossvalidation, and all processing will happen inside the cross-validation loop. That solve the data leakage problem. Here you can see how we can build a pipeline using a standard scaler and kneighborsregressor and pass it to cross-validation. --- # Naming Steps ```python from sklearn.pipeline import make_pipeline knn_pipe = make_pipeline(StandardScaler(), KNeighborsRegressor()) print(knn_pipe.steps) ``` ``` [('standardscaler', StandardScaler(with_mean=True, with_std=True)), ('kneighborsregressor', KNeighborsRegressor(algorithm='auto', ...))] ``` ```python from sklearn.pipeline import Pipeline pipe = Pipeline((("scaler", StandardScaler()), ("regressor", KNeighborsRegressor))) ``` ??? But let’s talk a bit more about pipelines, because they are great. The pipeline has an attribute called steps, which --- contains its steps. Steps is a list of tuples, where the first entry is a string and the second is an estimator (model). The string is the “name” that is assigned to this step in the pipeline. You can see here that our first step is called “standardscaler” in all lower case letters, and the second is called kneighborsregressor, also all lower case letters. By default, step names are just lowercased classnames. You can also name the steps yourself using the Pipeline class directly. Then you can specify the steps as tuples of name and estimator. make_pipeline is just a shortcut to generate the names automatically. --- # Pipeline and GridSearchCV .small-padding-top[ ```python from sklearn.model_selection import GridSearchCV knn_pipe = make_pipeline(StandardScaler(), KNeighborsRegressor()) param_grid = {'kneighborsregressor__n_neighbors': range(1, 10)} grid = GridSearchCV(knn_pipe, param_grid, cv=10) grid.fit(X_train, y_train) print(grid.best_params_) print(grid.score(X_test, y_test)) ``` ``` {'kneighborsregressor__n_neighbors': 7} 0.60 ``` ] ??? These names are important for using pipelines with gridsearch. Recall that for using GridSearchCV you need to specify a parameter grid as a dictionary, where the keys are the parameter names. If you are using a pipeline inside GridSearchCV, you need to specify not only the parameter name, but also the step name – because multiple steps could have a parameter with the same name. The way to do this is to use the stepname, then two underscores, and then the parameter name, as the key for the param_grid dictionary. You can see that the best_params_ will have this same format. This way you can tune the parameters of all steps in a pipeline at once! And you don’t have to worry about leaking information, since all transformations are contained in the pipeline. You should always use pipelines for preprocessing. Not only does it make your code shorter, it also makes it less likely that you have bugs.